Smart Farm
Smart Farm
Table of Contents
- ATV
- BIO Fuel
- BIO Gas
- Container Cabin
- E-bike Solar Charging Station 4
- Micro-Hydro
- Plastic Recycling
- Ram Pump
- Solar Pump
- Solar Router/IOT Gateway
- Wind generator
Intro
Projects
Using a subscription-free Long range messaging system for area not serviced by mobile networks it is planned to provide wireless monitoring and control of the farm.
A control console or mobile phone app connecting to a LoRa mesh, Bluetooth, Wi-Fi and other wireless networks. We chose “Meshtastic” for LoRa, due to its support and popularity.
As near all home automation devices require internet connectivity and either connect to, or a clone of theserver software.

The likely choice will be Home Assistant Green.


ATV


BIO Fuel
BIO Gas


Container Cabin
E-bike Solar Charging Station


Micro-Hydro
Meshtastic
Select your hardware
If you’re comfortable soldering and want just the board I recommend the LILYGO® TTGO Meshtastic T-Beam V1.1 ( $27 – $30), which comes with Meshtastic pre-installed and an unattached OLED display. You just need to solder the display to the board, throw in a battery, and it’s ready to go! current, common alternatives which they support:
Note: If you purchase a different board without Meshtastic installed, make sure to follow 7. Flashing & Updating Your Device to load it onto your board before you try connecting to it.The Meshtastic team maintains their own list of recommended boards and details on each here. Here’s a brief overview of them.- T-Beam V1.0 w/ NEO-M8N (Slightly better GPS) – $30.60
- T-Beam V0.7 w/ NEO-6M (No display) – $22.57

- TTGO LORA32 (No GPS) – $22.00
- Heltec LoRa 32 (No GPS – Built-in display) – $20.80
- T-Echo SX1262 (eInk display, battery, & enclosure) – $64.79
- WisBlock Meshtastic Starter Kit (modular) – $24.99 + Add-ons
Make sure to get the board frequency for your country:
US / JP / AU / NZ / CA – 915MHzCN – 470MHzEU – 868MHz, 433MHz
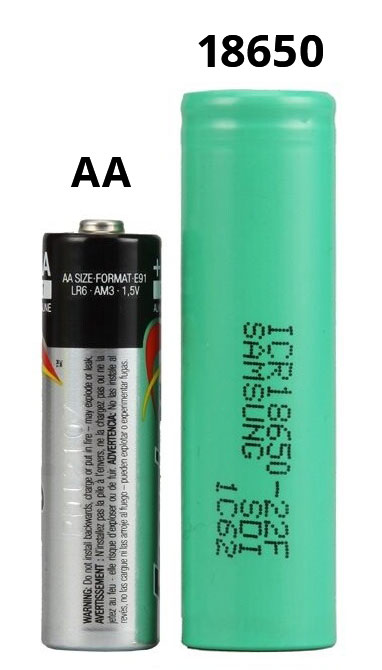
A full list of LoRa frequencies per region is available here.The T-Beam boards each require one 18650 battery. These are lithium-ion rechargeable batteries and slightly larger than AAs. You’ll be able to charge the battery with the board itself whenever you have it inserted and are powering it via-USB.
There are many reputable places to purchase 18650s. These are some known good manufacturers. For a quick recommendation, we suggest the Sanyo NCR18650GA 3500mAh.
- T-Beam V1.0 w/ NEO-M8N (Slightly better GPS) – $30.60
- T-Beam V0.7 w/ NEO-6M (No display) – $22.57
- TTGO LORA32 (No GPS) – $22.00
- Heltec LoRa 32 (No GPS – Built-in display) – $20.80
- T-Echo SX1262 (eInk display, battery, & enclosure) – $64.79
- WisBlock Meshtastic Starter Kit (modular) – $24.99 + Add-ons
There are many reputable places to purchase 18650s. These are some known good manufacturers. For a quick recommendation, we suggest the Sanyo NCR18650GA 3500mAh.
Attach the display
If you purchased a T-Beam board with an OLED display you’ll need to solder it into place. This isn’t as difficult as it may seem if you’ve never soldered before. You just need access to a soldering iron and/or someone who’s familiar with one.
This image provides a quick-reference for which pins your OLED should line up with.
4. Install the app
Install the Android app on your phone so you can pair it to your board. Optionally, you can find out how to sideload the app or join the Android beta tests here.
 The Meshtastic iOS app is currently available in TestFlight as a public beta with a projected App Store release in early 2022. There are plenty of remaining beta spaces available and there are no codes.
5. Connect to your board
Power on your board and then open the Meshtastic app on your phone. For the Android app you should your board appear in the list on the Settings tab. If you select it, a Bluetooth notification will appear and a code will be displayed on the board’s screen. Once you input this code you should be connected and able to set your screen name in the Connection tab.

7. Flashing & Updating Your Device
You will need to flash your board with a PC if it does not come with Meshtastic pre-installed or you have issues updating it via bluetooth. You’ll need to download the Meshtastic Flasher here for either Windows, Mac, or Linux. This page contains the most up-to-date instructions on using the software.
1. Download and install the latest version of Python. Here’s a quick link to the 64-bit version. Here’s their confusing list of all the other versions.2. Connect your board to your PC via USB. It should automatically power on.3. Download and install the Meshtastic Flasher (meshtastic-flasher-win.zip) for Windows. You need to unzip the zip and run meshtastic-flasher.exe. It will download and setup a bunch of packages.4. You should eventually see a window with the Meshtastic logo appear. Select GET VERSIONS.5. Select DETECT DEVICE.6. If it detects your device correctly, then you can select FLASH. If it doesn’t, you’ll have to manually select it from the Device dropdown.7. Watch the magic happen in a new window as it flashes your board.8. Assuming it was a success, your device should now appear inside your mobile app and you can follow step five to connect to it. Start meshing!


8. Add your node(s) to the  Map
Map
This is an unofficial map for finding other Meshtastic users, nodes, and repeaters. It’s great for letting others know about your network and collaborating on how to build it out.View the Map
9. Learn how to share the Meshtastic app offline
You may want to know how to share the Meshtastic app with other phones in the event you’re somewhere offline or off-grid and want to extend your network. If both your devices are running a recent version of Android it’s fairly straight-forward:
Add-ons
Off-grid Mapping
There are a few solutions for off-grid ATAK use in the works. Radacat is planning to release a plugin for their devices and I have written a plugin to integrate with Meshtastic devices that will be available on the Play Store soon.
There are a few solutions for off-grid ATAK use in the works. Radacat is planning to release a plugin for their devices and I have written a plugin to integrate with Meshtastic devices that will be available on the Play Store soon.
atak-forwarder
This add-on passes Meshtastic location data to ATAK
You can read more about the plugin here: https://github.com/paulmandal/atak-forwarder/
This add-on passes Meshtastic location data to ATAK
You can read more about the plugin here: https://github.com/paulmandal/atak-forwarder/
ATAK-CIV
https://en.wikipedia.org/wiki/Android_Team_Awareness_Kit
ATAK (Android Team Awareness Kit) is an open source geospatial mapping software developed by the U.S. Government for a variety of purposes. It is now available for free on the Play Store.
ATAK can use a wide variety of imagery sources (i.e. maps) and elevation data. It allows for easy route-planning, 3D View of an area, and many other cool features. Most importantly all of this stuff is free — in this guide we’ll set up an ATAK install for offline use. Note that ATAK is VERY feature-rich so we’re only going to cover some of the features here, please poke around in the app and see what works for you.
Plastic Recycling

RAM Pump


Solar Pump

Solar Router (IOT)
Wind generator

Comments
Post a Comment